- Published on
Toasty's OBS Setup: Recommended Hardware & Scene/Source Layout
- Authors

- Name
- BallisticToaster
- @ballistictoasty
Introduction
A week ago, I ran a stream talking about my streaming setup going over everything from audio mixing to my scene layouts as a way to help a couple people out who asked how I set things up on OBS and as a way to say "thank you" and give back to the community that helped me become a Twitch affiliate. To all members of the Crumb Club new and old, there's no way I could've done this without you and the community you all helped build. Thank you all so much for tuning in, following, chatting, lurking, and spreading word of our doughy deeds, the best is yet to crumb and I can't wheat for you all to see what's in store for the future of the channel!
Initially I had planned to just release the bullet-points I used to guide my thinking on stream and my list of sources on the Breadbox Discord server before I watched the VOD and realized just how much I'd need to cover in far greater detail than the bullet-points actually went over along with things I forgot to mention on stream and the moments I went off script to clarify certain things. With that in mind, this post is going to be the first in a series of in-depth guides that cover my streaming setup and will focus on the latest versions of both OBS Studio (28.0.1) and my Scene/Source Layouts as of this time of writing (September 13th, 2022). While I expect my layout will change over the next few months, weeks, or even days, a lot of the fundamentals will still hold true barring any major changes that occur over time and many aspects of this guide will still work for Streamlabs OBS.
This guide is not - and should not- be taken as a guide to set up the "ultimate streaming setup for OBS" because quite such a thing absolutely does not exist. Streaming, like any creative endeavor, is a process of constant experimentation and iteration where you discover what does and doesn't work for you based on your tastes as both a streamer and a viewer. The best thing that you can do if you want to be a streamer is to get started no matter how kit-bashed together you think your current setup might be so long as long as it helps you hit the ground running. Even if it's just footage of you playing a game while interacting in text chat, it's a good start if it helps you feel more comfortable. It'll also allow you to build your audience while leaving enough from for you to grow from there should you decide to expand your setup down the line.
It's also important to note that these guides will not focus on growing your audience as this will happen organically as you stream more often, watch more streams, and meet more people, especially through people you already know in your own community and circle of friends. After all, the people who follow you aren't just there to watch you play or do something else; they're also there because of the broadcaster themselves and the environment you help foster in your community through chat and stream. The journey of being a streamer matters a lot more than where you decide the destination is and I hope this guide helps provide enough information so you can better enjoy that journey for yourself.
Recommended Hardware, Bitrate, & Recording Settings
Recommended Hardware
As OBS is a relatively resource intensive application, it’s advisable to have a decently powered computer before downloading OBS. The OBS Project’s official website lists a Direct X 10.1 compatible GPU, a quad-core CPU, more than 4-8GBs of RAM, and a compatible operating system (Windows, Mac, and Linux) as basic requirements to enable proper functionality.
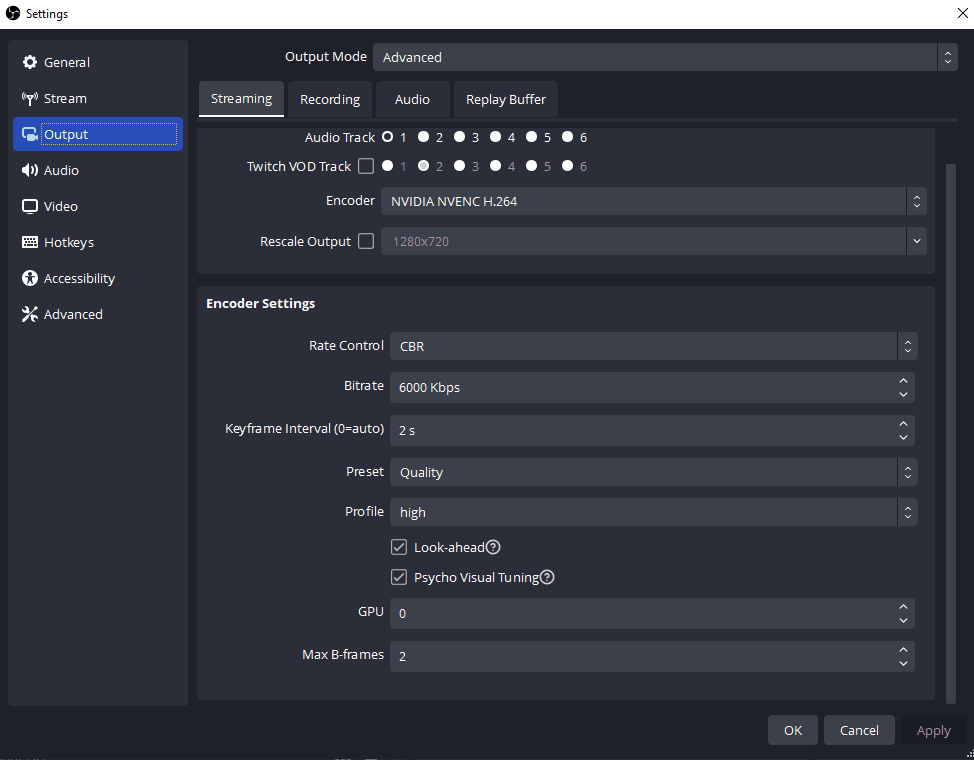
Your GPU will also play a role in determining what kind of hardware encoder you’ll be able to use while you stream and record. For instance, an Nvidia GPU will allow you to use NVENC, the hardware encoder I personally use on OBS. AMD makes use of AMF and any settings you have to tweak depends on any hardware encoder you use.
These are a shortened list of my PC specs as of this writing.
Intel i7-7700K
Nvidia Geforce GTX 1070
16GB of DDR4 RAM.
Windows 10
A good quality microphone and webcam should also be considered though this will depend on user preference, budget, etc. so your mileage will vary on this front. Whatever helps you hit the ground faster will generally work. More information will be covered on this later in the guide.
It’s also advisable to consider a second monitor to independently control OBS away from the game, but other methods also exist to enable external stream control such as Touch Portal or the Stream Deck. A mobile device or another computer such as a laptop may also be used to monitor chat and the quality of your stream through Twitch’s Creator Dashboard, making streaming much easier for single monitor users, especially for those that make use of larger sized and ultrawide displays.
Resolution and Bitrate + Recording
Resolution is a measurement of how many pixels make up your display. In the context of OBS, your resolution is what will be streamed to Twitch or any live streaming platform of your choice. The factors that can affect what resolution you can stream at and the quality of your stream come down to the encoder guidelines of whatever livestreaming platform you choose to stream to, the quality and speed of your network connection, and the performance of your computer.
Bitrate refers to the number of bits per second that can be transmitted along a digital network. OBS measures them in terms of kbps (kilobits per second) and the way they’re defined in your OBS settings influence what quality and framerate your stream will look have on Twitch’s servers. More information can be found below in this chart taken from this link. While OBS does have an “Auto” option for server selection, it’s also worth manually connecting to the server closest to your location but if you’re having difficulty determining that for yourself, you can use TwitchTest on Windows to determine the right server for you.
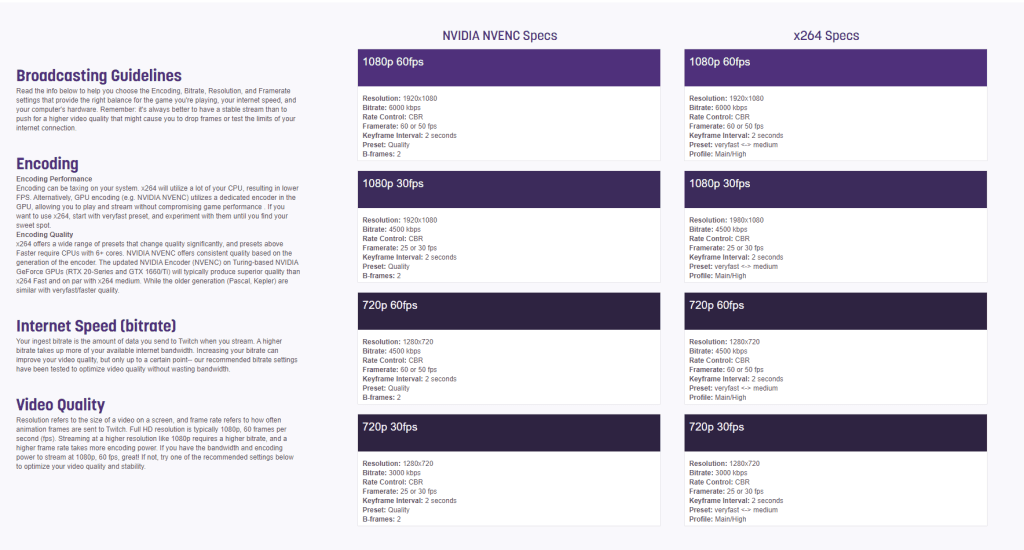
To add these settings, click on the Settings button or “File → Settings” and navigate to the Output menu on the left navigation bar. Then add the appropriate settings below. Make sure your streaming and recording settings match! This is recommended if you wish to test to make sure your streaming setup looks and sounds good!
For most people, streaming at 720p at 60fps is more than satisfactory. This is due to how much less bandwidth is required to stream at that resolution and framerate but to account for bandwidth usage of mobile users as well. While the most popular resolution according to Steam’s most recent hardware surveys is still 1080p as of August 2022, a good 720p stream will still look perfectly serviceable on most displays.
To downscale your resolution for streaming, you’ll want to click on Settings, navigate to the video settings and set your “Output Scaled Resolution” to be whichever resolution you’d like to stream at and set the downscaling filter to whichever filter you like. Normally “Bicubic” tends to work for most people and was what I used when I streamed at 720p/60fps.
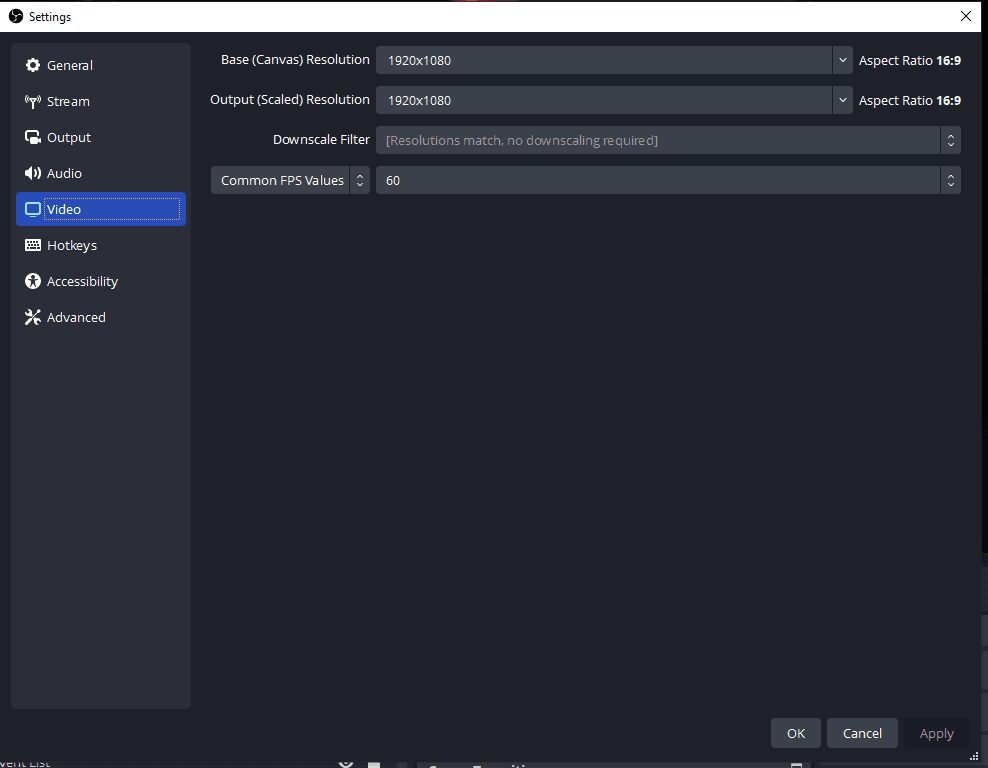
💡 NOTE: “Always use Output resolution whenever possible. It looks better and gives you an option to chose a downscale filter. Rescale output is used if you want to record and stream at different resolutions. Ex. you want to record at 1080p and stream at 720p. You would set your Output resolution to 1080p and rescale output in stream tab to 720p. That's really the only reason you would want to use rescale output.”
Scenes and Sources
After you go through the initial set-up process of OBS, including downloading the application, installing it, and then signing into it using your Twitch account, it’s important to take in some of the terminology that you’ll be seeing throughout this guide.
Scenes refer to the individual screens that a streamer can swap between throughout stream. Scenes are made up of sources.
Sources are individual, reusable components that make up a scenes such as audio capture outputs like speakers, audio capture inputs like microphones, browser capture sources for alerts, chat, and other widgets. Scenes can also be added as sources for other scenes.
The scenes in Italics are referred to as Static Scenes, or scenes that do not require streamer interaction unless it’s to change between scenes. The scenes in Bold are known as Dynamic Scenes and REQUIRE streamer interaction such as being on camera, talking, or using a display source of any kind.
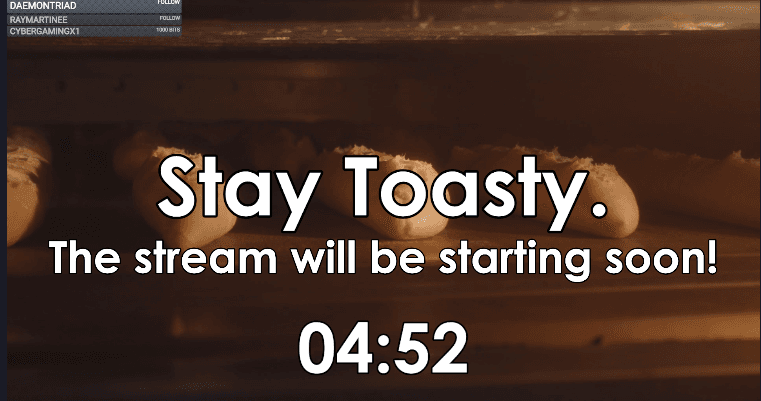
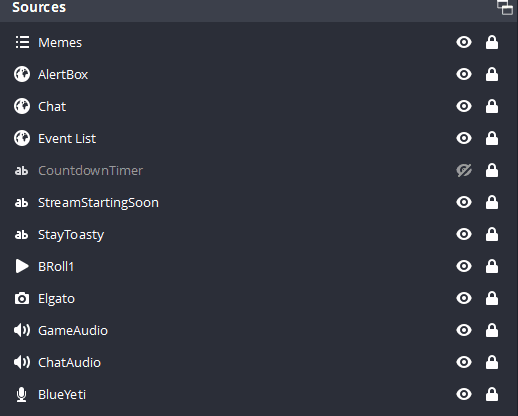
- Starting Soon
- What the viewer sees before the streamer does anything. Contains two text elements along with B-Roll footage, a chatbox (with custom CSS), alert box, and an event list taken from Streamlabs. When the countdown timer runs down to zero, the starting soon scene will transition immediately to the Facecam scene.
If you wish to use a countdown timer, a link to the download for the one I use can be found here and can be set up by clicking on Tools → Scripts and clicking on the plus button below to add the TorMyVanCool_OBS_AdaptiveCountdown.lua script to OBS.
While not needed for everyone’s stream, B-Roll footage for all scenes that use them were found in various stock footage resources online and stitched together using DaVinci Resolve.
- What the viewer sees before the streamer does anything. Contains two text elements along with B-Roll footage, a chatbox (with custom CSS), alert box, and an event list taken from Streamlabs. When the countdown timer runs down to zero, the starting soon scene will transition immediately to the Facecam scene.
- This scene acted as a foundation used to build out the rest of the scenes from. As such, every scene after this relies on the same source arrangement and hierarchy to ensure visual and organizational consistency across all scenes.
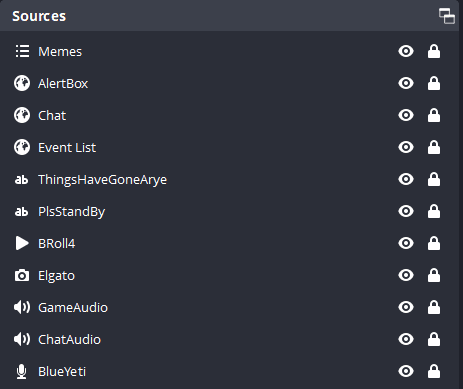
- Arranging sources in OBS makes use of a top-down hierarchy where the higher up the source is on the list, the more visual prominence it takes up on the screen allowing them to overlap other sources below it. Below is a general structure of how the hierarchy works for most scenes.
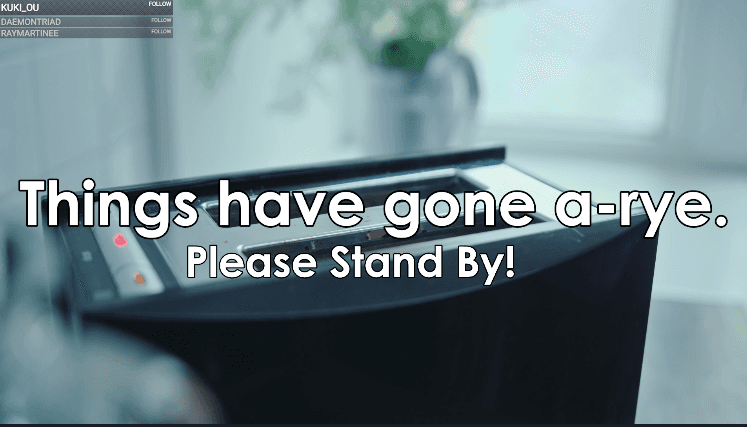
For meme scenes to work properly, they go right to the top to override any source that’s currently being displayed. More will be discussed for meme scenes later in this guide.
Below them are Streamlabs widgets for the Alertbox (not pictured), Chat (Not pictured) and the event list.
- 💡 NOTE: Text sources are generally arranged depending on where they need to be and on what scene is being used. In this case, they’re directly below the widgets.
Below the widgets are video-based sources such as capture cards, game/display capture sources, and video/B-Roll.
Audio sources go right to the bottom of the list for easier identification across each scene
- 💡 NOTE: For a lot of Static Scenes, Elgato capture cards are (sometimes) used for audio capture purposes to ensure that there’s background audio of some sort to fill in the silence. Otherwise, background music from other games (provided they aren’t copyrighted) or non-copyright music can also be used as well.
- Arranging sources in OBS makes use of a top-down hierarchy where the higher up the source is on the list, the more visual prominence it takes up on the screen allowing them to overlap other sources below it. Below is a general structure of how the hierarchy works for most scenes.
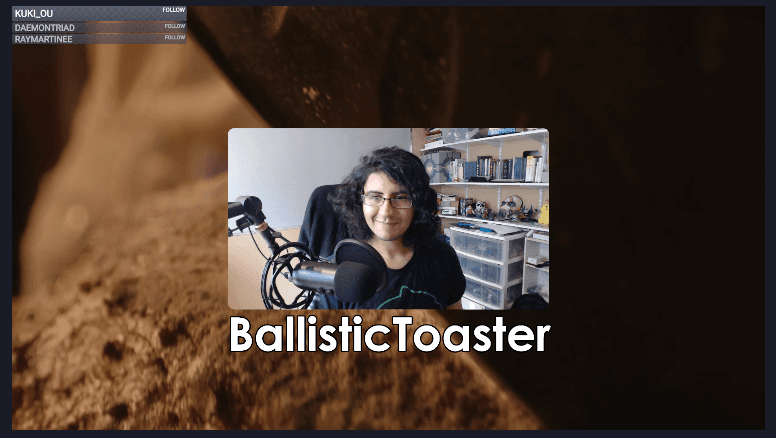
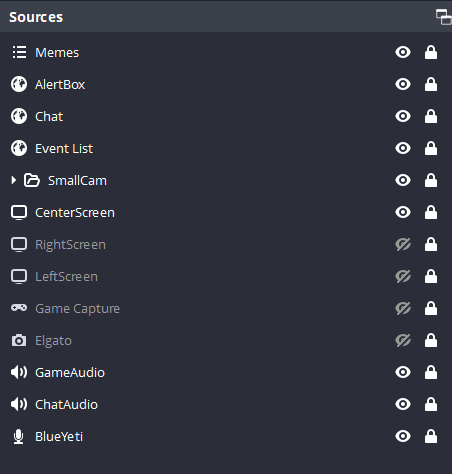
- Facecam:
- What the viewer sees when the Starting Soon countdown timer reaches zero or when the streamer manually transitions to the scene. The Facecam scene includes two sources for the small and fullscreen camera sources respectively.
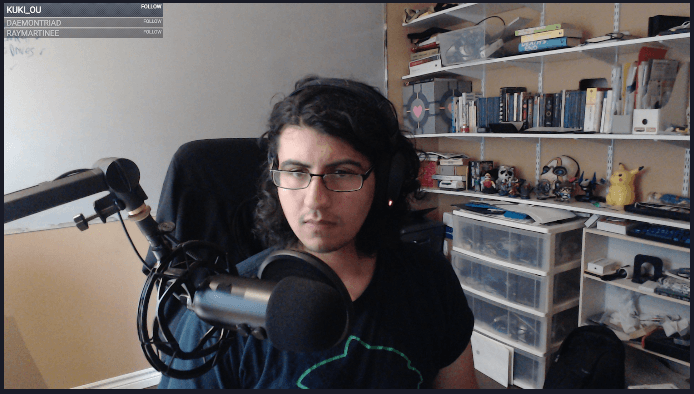
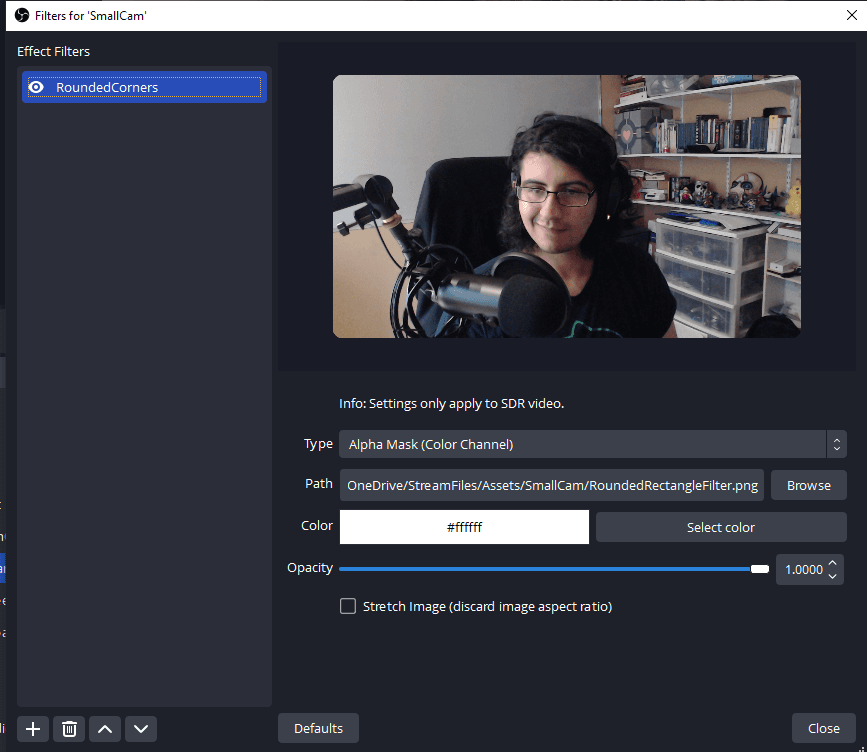
- While the arrangement for the other sources remain mostly the same, one major difference is the inclusion of a folder with the words “SmallCam” on the label right below the FullScreenCam. When the folder is expanded, we can see the folder contains another FullScreenCam source.
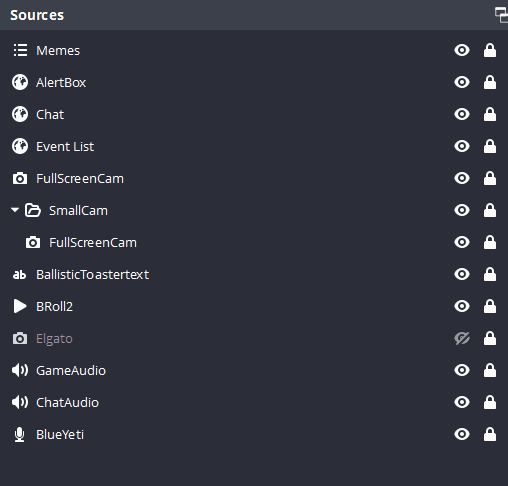
- This is done to get around a the way OBS applies filters across sources and scenes. Because sources are reusable, it means any filters that are applied to them carry over throughout any scenes they are applied to. As a result, you can’t apply different filters to the same source across multiple scenes.
- Getting around this is as simple as adding a group and adding the relevant source(s) to it. In this case, we add another copy of our FullScreenCam into our newly created group and apply any desired filter we want to the group itself.
Filters are also how you can add Chroma Key and Color Correction to make better use of green screens. Additional filters can also be added to further crop the view
If you’d like to add a rounded rectangle filter to your camera, plenty of choices exist online and can be created through the use of tools such as GIMP or Photoshop. One example can be found here.
- Getting around this is as simple as adding a group and adding the relevant source(s) to it. In this case, we add another copy of our FullScreenCam into our newly created group and apply any desired filter we want to the group itself.
MainDisplay
- What the viewer sees when the streamer is playing a game or viewing content. This scene contains all widgets, the SmallCam, and all needed Display Capture sources for any connected monitors, a Game Capture source, and a Capture Card source.
While the source hierarchy of this scene is a lot lengthier, the same structure from the Starting Soon scene still remains; This time, we have a Game Capture right above the Elgato Capture source and three separate display captures to account for the screens hooked up to my computer to better showcase content on multiple screens, such as web content or a game in case the Game Capture isn’t able to hook to the game’s application properly. (Example: Destiny 2 has issues with Game Capture, so Display Capture is the more preferred option. In this case, the CenterScreen Display Capture source.)
Your source hierarchy will vary based on how many displays are hooked up to your computer at any given time. While the picture above makes use of three, most streamers tend to do fine with two monitors or single monitor setups, especially ultrawide or larger sized displays. This process is made more expedient through the use of external stream controls such as the Stream Deck and TouchPortal, including mobile devices and the Twitch app.
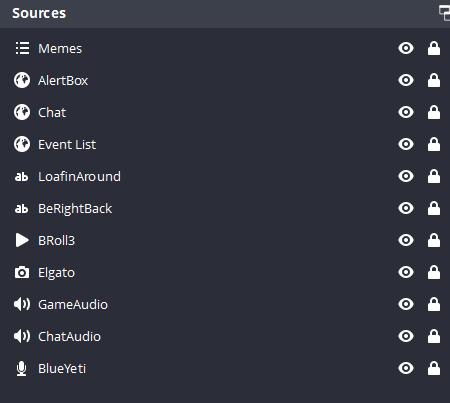
Be Right Back
- Tells the viewer that the streamer is away for other reasons; such as switching the game, changing the stream description, getting water, etc. The microphone may be audible for this scene too.
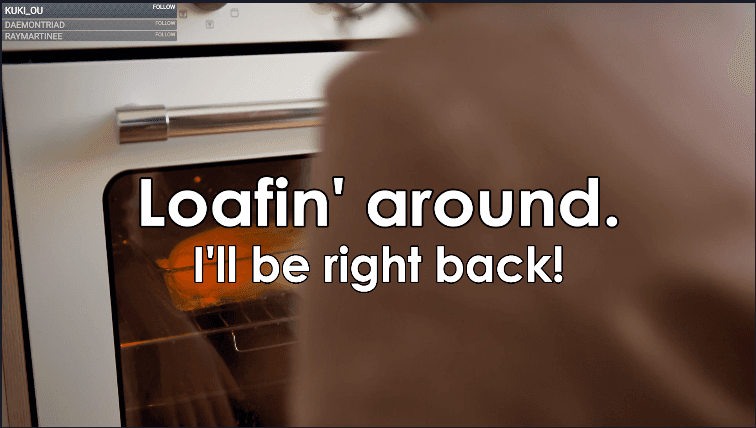
- Contains the exact same source hierarchy as the Starting Soon screen.
- Technical Difficulties
- Tells the viewer that the stream is experiencing issues and is in need of maintenance. This scene is used in the event of unexpected technical emergencies on the network, hardware, or software side in case the stream shuts down for any reason. The microphone may be audible for this scene too.
- Uses the same source hierarchy as the Starting Soon and Be Right Back scenes.
- Stream Finished
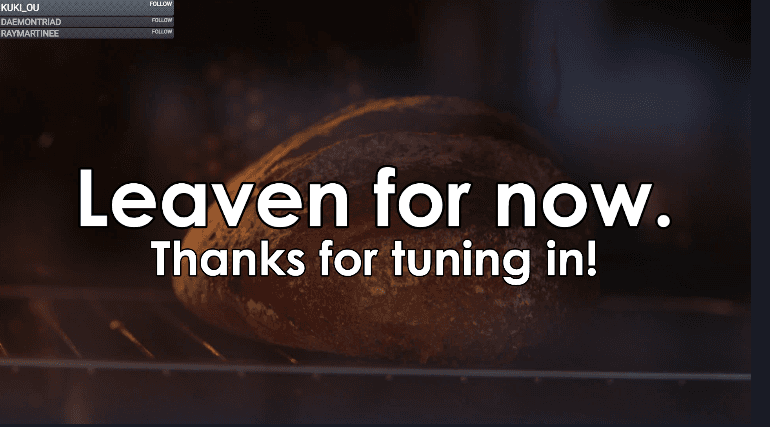
- Tells viewer that the stream is ending. Often the last thing that’s seen before stream ends and/or a raid is started.
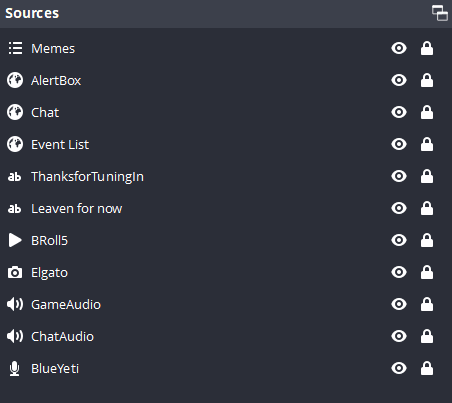
- Contains the exact same layout as the Starting Soon, Be Right Back, and Technical Difficulties scenes.
💡 NOTE: All scenes and visual capture sources (Display Capture, Game Capture, Elgato, Web Cam) have Fade In and Out Transitions that last 400ms. The font used on all scenes is Century Gothic Bold with a black outline and a white text-fill.
In a given stream, the streamer flow typically looks something like this:
Starting Soon (start countdown timer if needed, wait till it expires or manually transition to next scene)
Facecam (If timer expires or manually transitioned)
- Be Right Back (If something needs to be attended to)
- If resolved, swap back to previous scene
- Technical Difficulties (If an unexpected issue pops up)
- If technical difficulties persist, End stream on this scene.
- Be Right Back (If something needs to be attended to)
MainDisplay (And relevant sources)
- Be Right Back (If something needs to be attended to)
- If resolved, swap back to previous scene
- Technical Difficulties (If an unexpected issue pops up)
- If technical difficulties persist, End stream on this scene.
- Be Right Back (If something needs to be attended to)
Facecam
- If streamer decides to raid, type /raid USERNAME_HERE command in chat before transitioning to next scene.
Stream Finished
- Enter /raid Command here. End stream once raid goes through by clicking “Stop Streaming".
Stay Toasty for the next parts of this guide, to be posted here as they are uploaded where we'll cover:
Audio and Audio mixing
Touch Portal and Meme Scenes
Moderation and Raid settings
Until next time, this is BallisticToaster, signing off!