- Published on
Toasty’s OBS Setup: Touch Portal & Meme Scenes
- Authors

- Name
- BallisticToaster
- @ballistictoasty
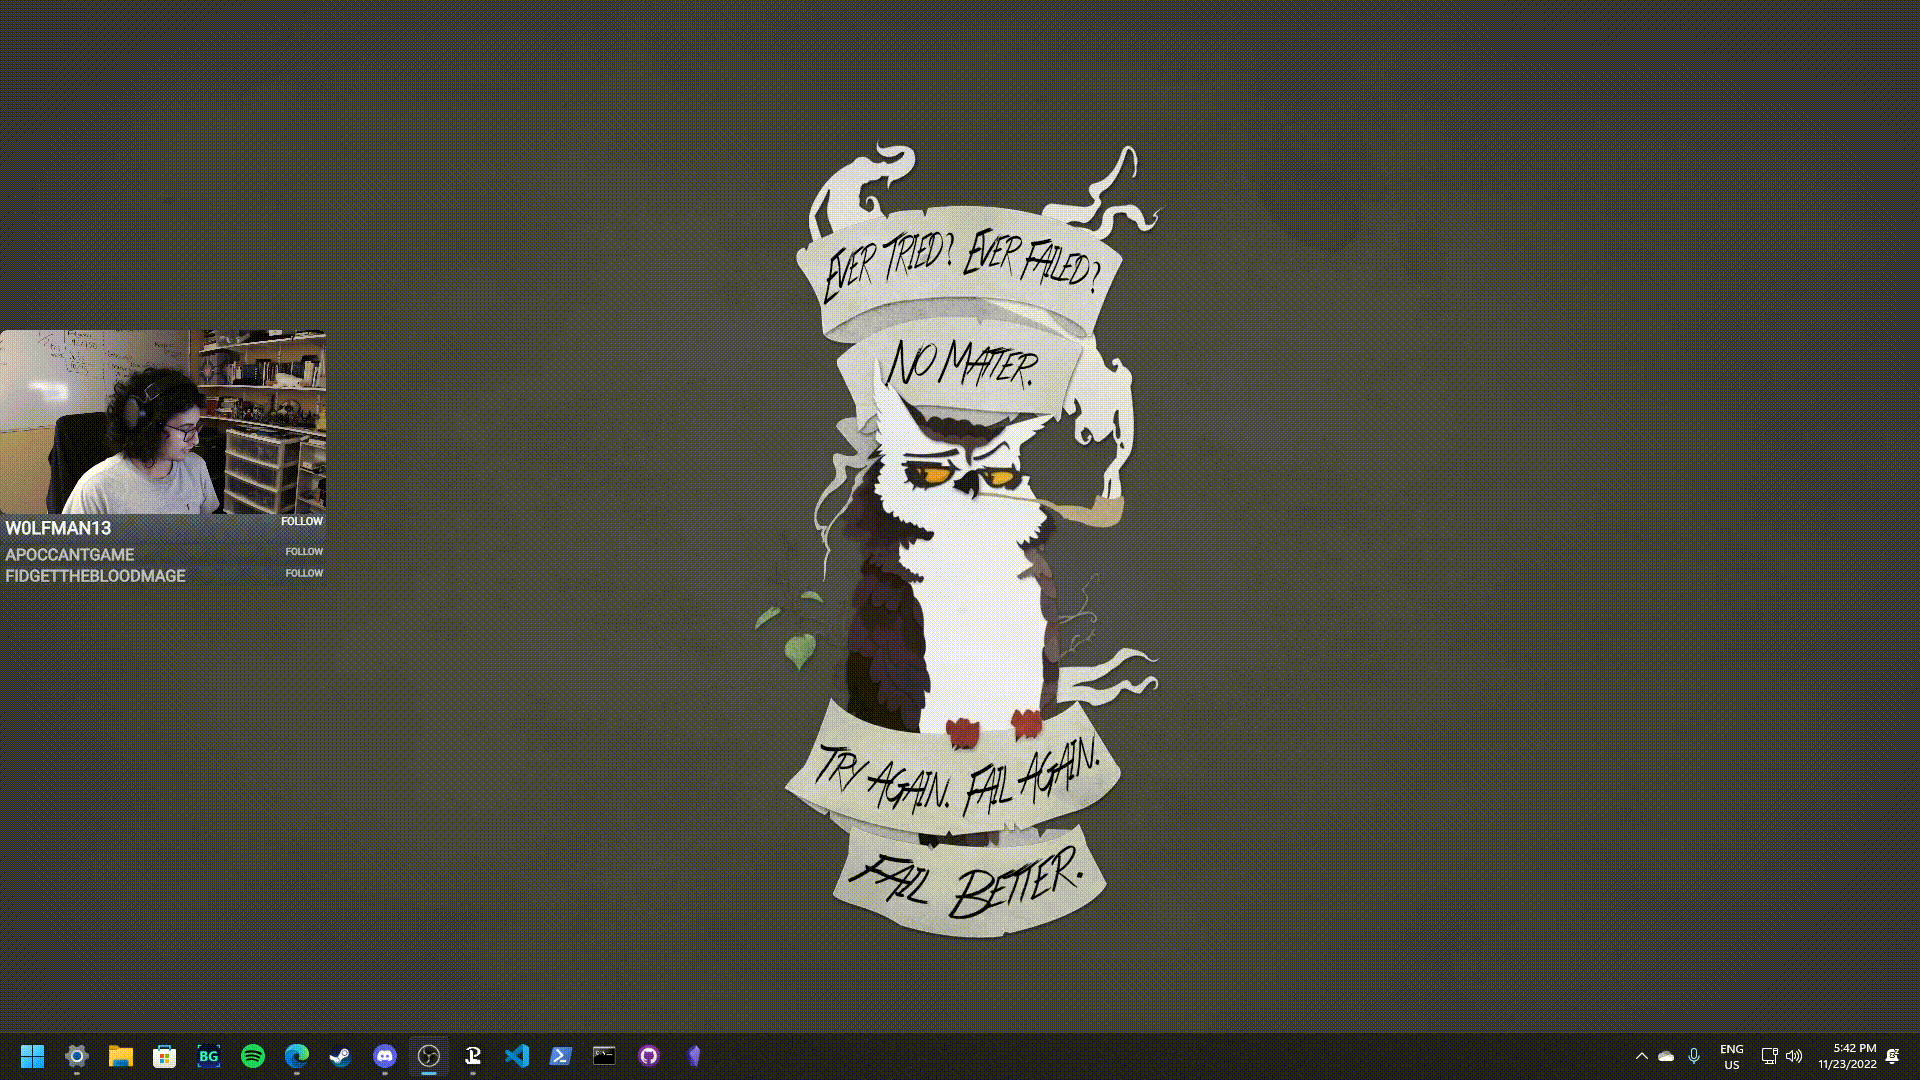
In the first OBS setup post I published, I made mention of external stream control tools such as the Elgato Stream Deck and how they can greatly streamline and automate aspects of streaming especially if you only have one monitor. Today we're going to be focusing on one such example that makes streaming much more convenient, only relies on a tablet or smartphone, and enables moments such as this.
Meme Scenes
If you'll recall part one, we touched on two different types of scenes: Static and Dynamic scenes. Static scenes require no streamer interaction while dynamic scenes require them. Today we'll be introducing a third type of scene: Meme Scenes. Meme scenes are the name given to scenes such as the example seen above and are typically used to reference or make light of the current situation in response to a certain context. As such, Meme scenes can be seen as something of a happy medium between both dynamic and static scenes that if used properly can make your viewers that much happier for their inclusion and usage.
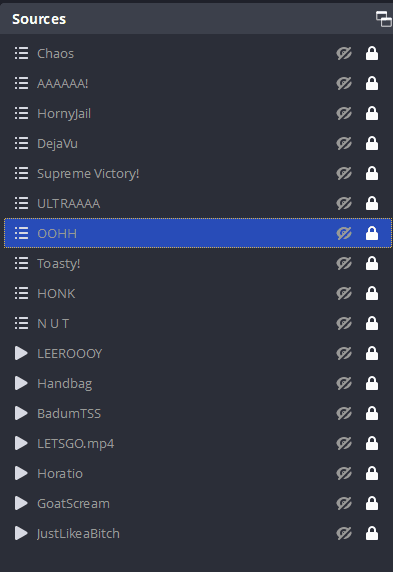
Meme scenes take advantage of the top-down source hierarchy of Sources with regards to visual prominence and how scenes can be added as distinct sources. To achieve the desired effect in the video example above; all six core scenes* use a source layout that's roughly analogous to the example below where the source labeled Memes (Denoted by bullet points) is placed at the very top.
*: The six core scenes are Starting Soon, Facecam, MainDisplay, BRB, Technical Difficulties, and Stream Ending.
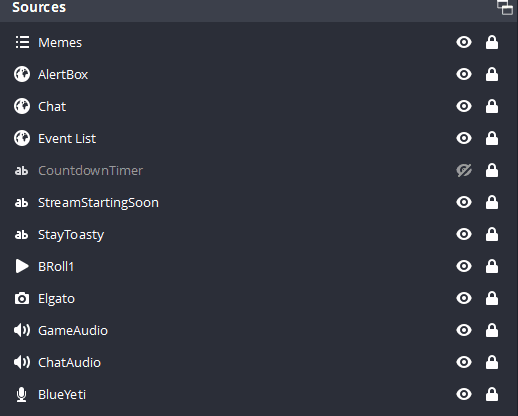
When a specific meme scene is invoked via an external stream control tool, the invoked scene will overlap all visible sources for the duration of that scene's run time. So, if we're able to select multiple meme scenes from that scene alone, what does that 'Memes' scene's source layout look like? The answer is plenty of nested scenes (denoted by bullet points) and media sources (Denoted by the play icon) all under a single scene.
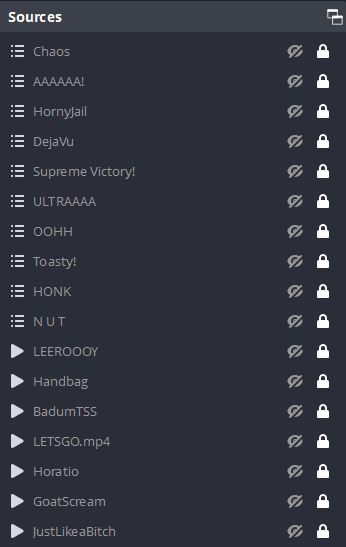
Described simply; we can think of the 'Memes' scene we import as a source to the six core scenes as the "Parent" and all the scenes we can invoke through that scene as "children." This parent-child relationship between the imported meme scene and nested meme scenes can be seen above. All children meme scenes are set to hidden by default so that any external stream control tool can simply show and hide them as necessary for the duration that they are supposed to be active for. The media sources are fairly straightforward; typically, these are set to play the entire duration of the media source (you can even make your own media sources as meme scenes using video editing tools such as Da Vinci Resolve, even audio editing and mixing tools like Audacity can do the trick too) while the imported scenes may be more complex. At their simplest, an imported scene as a meme scene can include a visual source such as an image and a media source like an audio file that are invoked to be shown for a specific amount of time before the scene itself is hidden.
This post will focus on four specific meme scenes as follows:
Horatio (The CSI/ pun Scene) - For Media Sources as Meme Scenes
OOHH (The Horn/hype scene) - For granular timing of individual sources.
SUPREME VICTORY! (The "Victory is mine!" scene) - For Transition Effects.
Deja Vu (the "I've been here before" scene)- For Source Filters
Before we touch on those, we first need to talk about the stream tool that we'll be using throughout this post.
Touch Portal
Touch Portal is a free application that can be downloaded to both your computer (for Windows and macOS) and mobile device (for iOS and Android). The desktop version is where you set your buttons up while the app on your mobile device connects and initiates the commands to send to Touch Portal on your desktop, thus initiating the requisite actions. Touch Portal can be used for a variety of system level commands such as starting an application to running scripts, opening folders/documents, writing text, adjusting the volume, controlling media playback, and much more all through the click of a virtual button complete with programmatic logic such as conditionals, loops, and variables. It can also communicate with third party applications such as OBS Studio and Streamlabs OBS, services such as Twitter and Twitch, even with other popular applications such as Spotify and Discord through plugins.
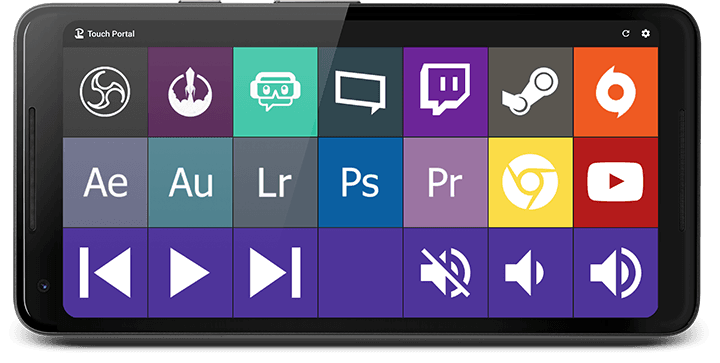
Best of all, Touch Portal supports a wide variety of mobile devices as far back as iOS 9.3 (released in 2016) and Android 4.1 (released in 2012), ensuring that old devices gain a new lease of life as dedicated Touch Portal controllers. The free version of Touch Portal is good for those who merely want to experiment with the application and get a feel for it, but a one-time $13.99 purchase guarantees a non-transferable lifetime license to the Pro version, allowing users to add an unlimited number of pages (up from two pages included in the base version), variable grid sizes, customizable pages, and -most importantly- remote control of OBS Studio. As a result, the Pro version is necessary for those who want to use Touch Portal to control OBS Studio, meme scenes, and their stream along with it.
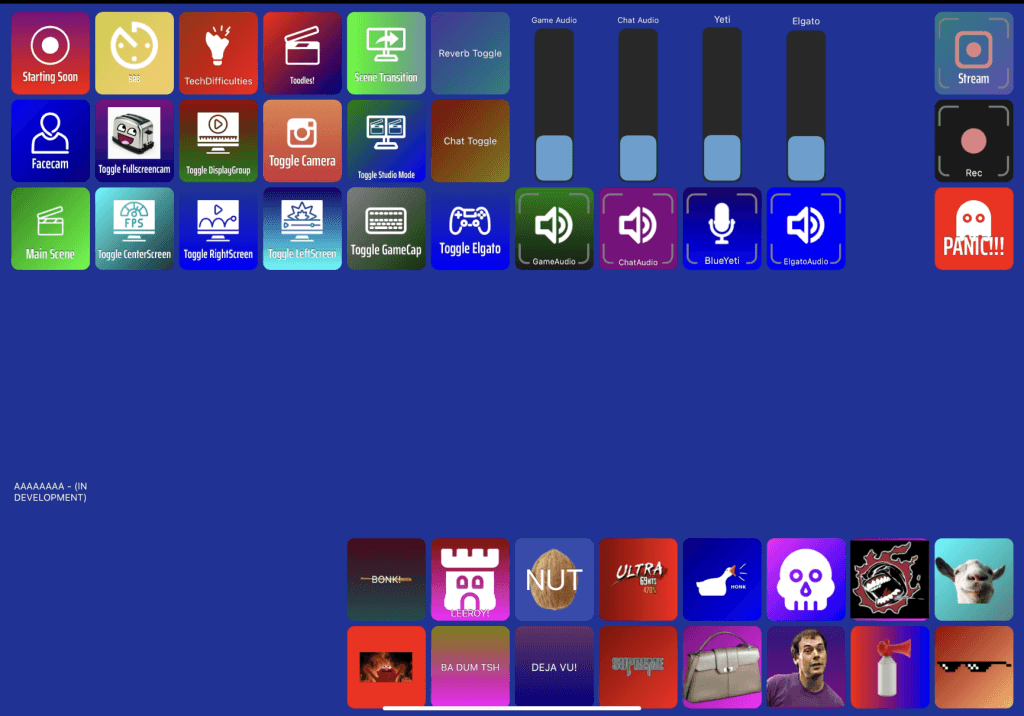
Below is the current state of my Touch Portal interface, where multiple buttons help to toggle and transition scenes and source displays across states such as Studio mode. The six core scenes have their own dedicated buttons accompanied by source control buttons that show/hide different sources while audio sources have accompanying buttons and sliders to outright mute audio from a specific source or control the volume on OBS respectively. These work hand in hand to also control the various meme scenes exclusively located on the bottom half of the interface.
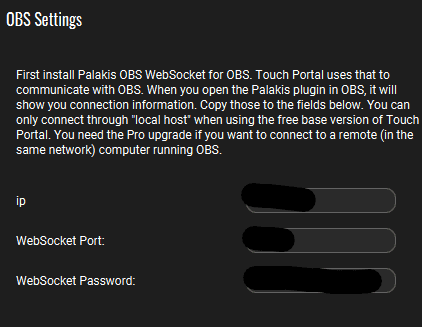
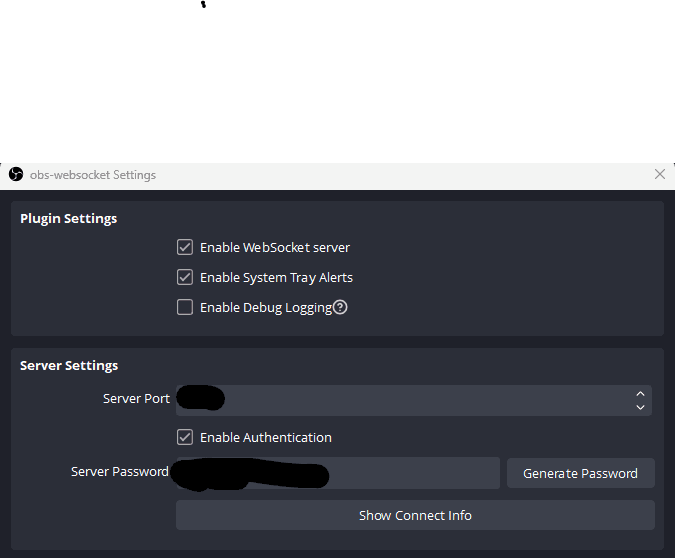
To set up Touch Portal with OBS after installing the Desktop application, simply click on the settings menu and click on OBS Settings. You're going to want to follow the instructions, meaning downloading the OBS-Websockets plugin to communicate with TouchPortal and ensuring the fields in Touch Portal and the unique password you set for it match what you put in for OBS-Websocket. The image below on your left is for Touch Portal's OBS Settings while the image below on your right is for OBS-Websocket settings.
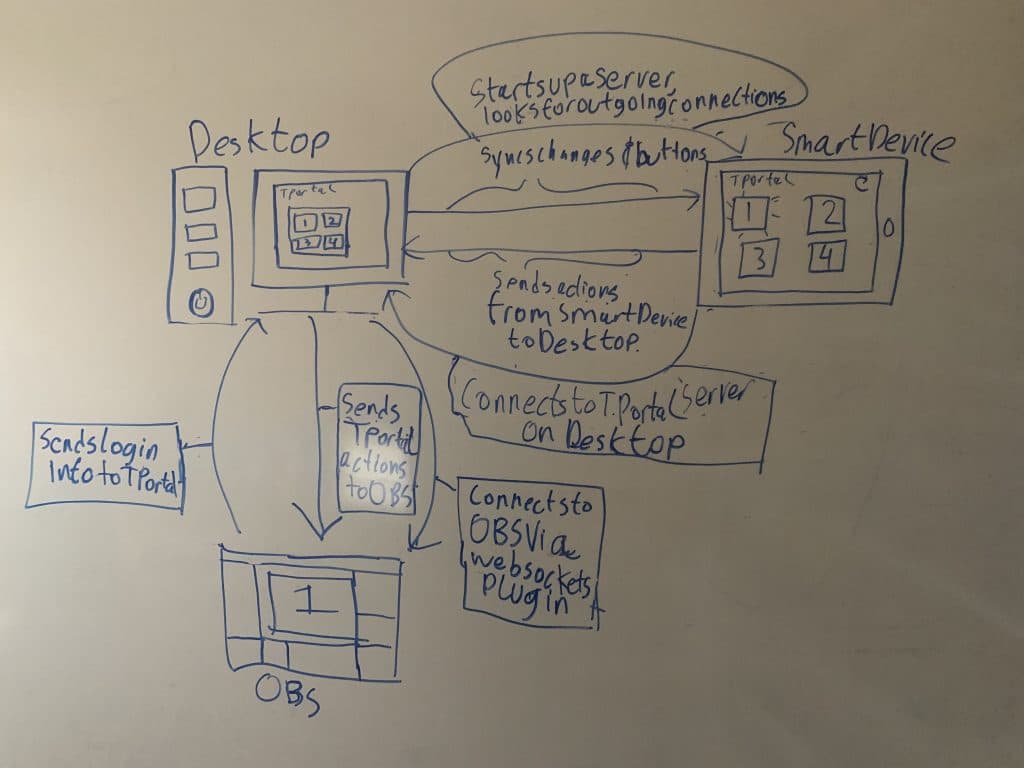
Below is a diagram of how Touch Portal works as drawn on my whiteboard for better illustration.
Setting up a Meme Scene in Touch Portal and OBS.
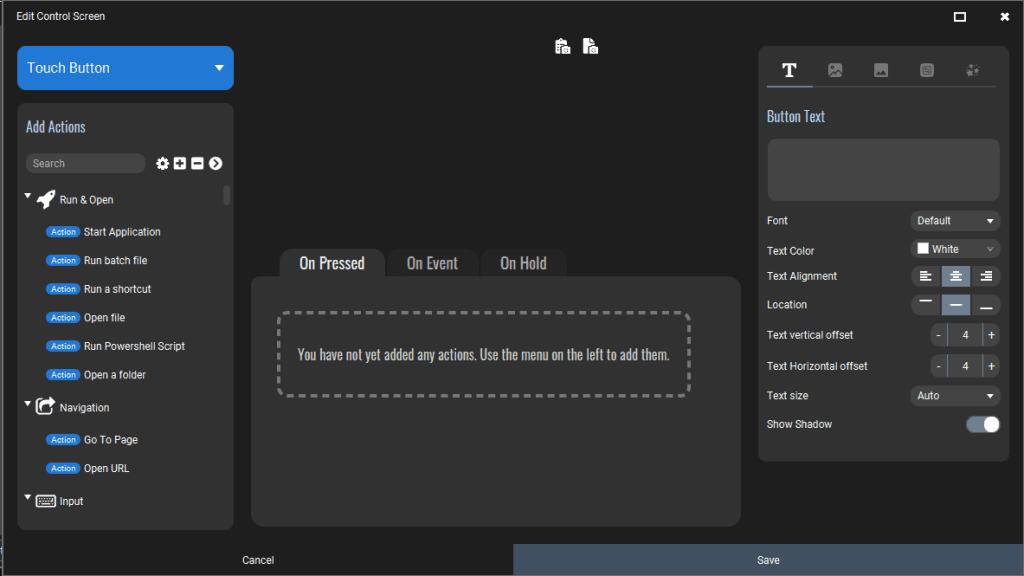
Now the question is "How are these buttons set up?" Clicking any empty space or an existing button on Touch Portal takes you to a separate menu where you can add additional functionality, including programmatic logic according to certain actions. A lot of buttons are mapped to activate "On Pressed" actions, meaning that just pressing the button on Touch Portal activates the meme scenes or switches scenes altogether. You can also customize the buttons with icons, text, etc. so they take on visually distinctive appearances from a glance of your smart device, along with positioning the buttons themselves in places that will work better for your muscle memory mid-stream.
Before setting up a Meme Scene in Touch Portal, we need to ask the following questions:
What exactly are we trying to convey?
- IE: Hype, anger/frustration, sadness, trash talking, or puns?
How many sources do we need to show that?
Can this be accomplished with one source or multiple?
Do we need to use video editing software to accomplish that?
Is audio more than sufficient?
How will it sound, and do we need any visual assets?
- This includes consideration of audio mixing, additional images or videos, and if any animations or filters are needed.
What's the most basic implementation of this that can be added in Touch Portal and how can we test it in OBS?
- This would mean a lot of experimentation and breaking a single meme scene down into the simplest possible version.
Are there other examples we can pull from in other meme scenes?
- Is there another Meme Scene that's already been set up that can allow us to achieve what we want?
Do we need to add filters to the sources in OBS to get things working properly? (IE: Lumen key, transparency, transitions, etc.)
- What if we wanted to use a color as a meme scene that's overlaid on top of the screen, what transparency do we need to add to get the desired effect?
Horatio
"Horatio" is a meme scene typically used to punctuate (heh) puns that've been made on stream using a brief snippet of the CSI Miami opening theme. "Horatio" is what's referred to as a "Media" meme scene and it's usually the most common type of meme scene you'll see throughout stream and the easiest one to set up. All what needs to happen is for the button to be pressed which then shows the meme scene in question before being hidden after an interval of time passes, usually the length of that source. Media meme scenes often consist of just one media source playing back and often it's a video or a small audio effect such as a rimshot, applause, or a laugh track.
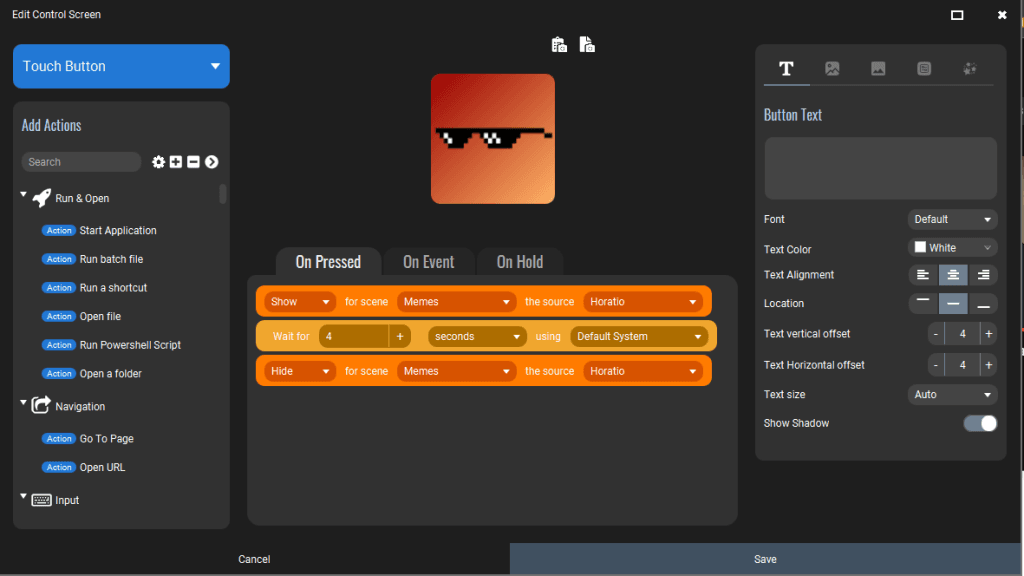
If you'll recall the source layout of the parent Memes scene, media meme scenes (as denoted by the play icon) are typically hidden so that Touch Portal triggers showing the scene for the length of time that media source lasts for before being hidden. Thankfully the example seen at the beginning of this post is a pitch-perfect example of the Horatio scene at work and the Touch Portal blueprint below is an example of how to get these kinds of scenes working.
![Touch Portal Settings for how to set Horatio up, to show the scene for four seconds before hiding it.]](/static/images/toastyOBSpart3/image-16.png)
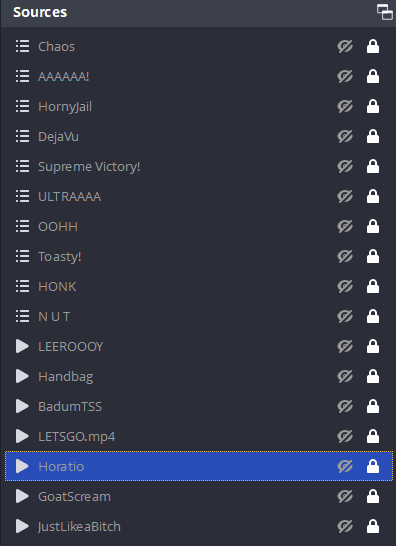
Because this is the simplest Meme Scene to get working, it's also a good time to introduce a couple things that will play a key part in how you design, test, and implement Meme Scenes. To start, you're going to want to play extra attention to the properties of a media source that you import into OBS Studio. In this case, right clicking on "Horatio" will take us to an extra window where we can see the following options underneath the file path.

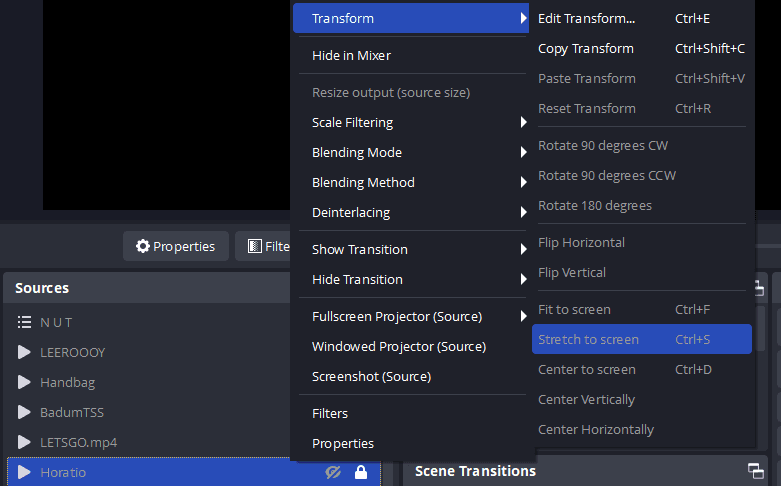
To properly position where a meme scene is going to appear, it's worth clicking on Loop so you can properly adjust its positioning to your heart's content. To get a meme scene to fit the entire screen, select a specific media source, unhide it if it's hidden, and then right click on it. Select "Transform" and choose whether to stretch or fit to the entire screen.
Be sure to uncheck "Loop" in the media source properties once you're done. Make doubly sure that the settings above are set for all meme scenes you wish to use, as "Restart playback when source becomes active" and "show nothing when playback ends" are what allows the meme scenes to be resettable after Touch Portal fires the meme scenes.
The next thing you're going to want to change is being able to monitor meme scenes. By default, media sources do NOT output and monitor the audio of what you're playing back in a meme scene. This is usually a good thing for audio devices like headphones and microphones so you don't hear them playing over each other mid-stream and causing an echo effect, but this means you can't hear anything on your end when a meme scene is being activated. As such, it creates a disconnect between yourself and your viewers as to whether or not a meme scene has properly fired and is audible to your audience.
To begin fixing this, you're going to want to navigate to your OBS Settings, click on "Audio" and then select a monitoring device so you can hear things properly through the desired audio device. In this case, I opted to choose the same one that my GameAudio channel uses and because meme scenes tend to be louder than the GameAudio, it won't result in any issues that causes the audio to repeat twice after a Meme Scene has been fired.
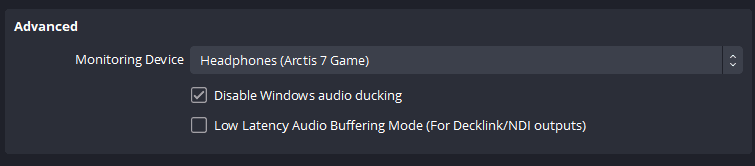
Apply your changes, then right click on the audio mixer and select "Advanced Audio Properties". Uncheck "Active Sources Only" and look for the Media Source you wish to change. Once you find what you're looking for, click on the dropdown box for "Audio Monitoring" and select "Monitor and Output".
In general, you'd want to enable "Monitor and Output" for the following:
Meme Scene Media Sources.
Sound Alerts
Alert Boxes
OOHHH (The Horns)
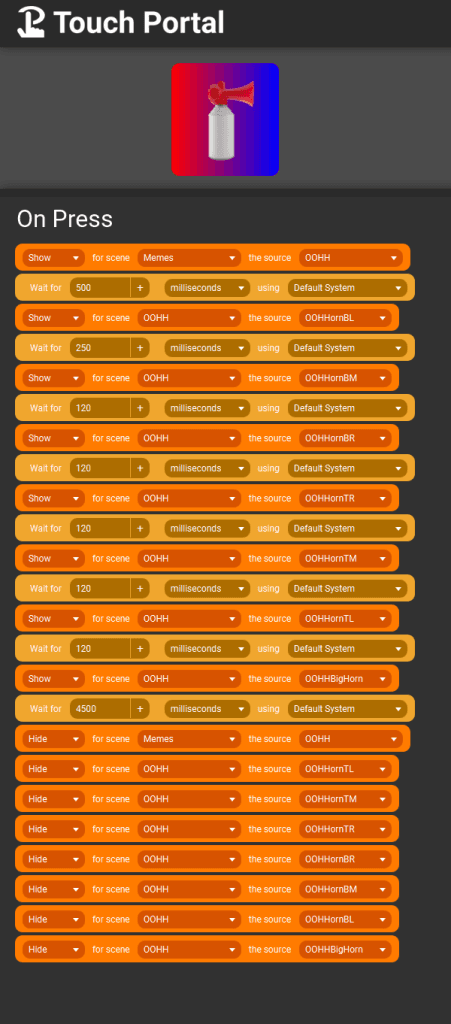
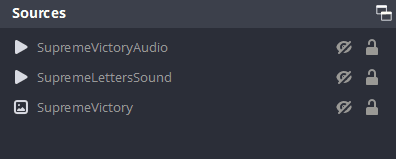
The "OOHHH" meme scene is what's known as a timed meme scene, where each source is shown and hidden on a set interval of time, often with varied sources of different types. This scene is used mostly to punctuate hype moments, insults, burns, or completing milestones. If we look at the source layout of the parent Memes scene, we can see the highlighted child scene titled "OOHH" contains a source layout that comprises several horns with the BigHorn asset at the top and several "OHHHorn" images below it that cover the Top Left, Top Middle, Top Right, Bottom Right, Bottom Middle and Bottom Left of the screen.
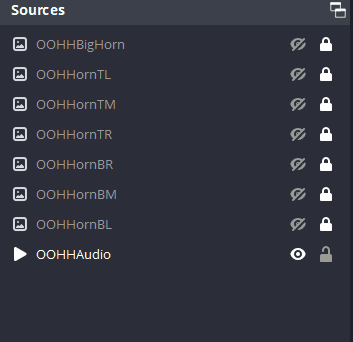
The seven horn images are hidden by default so that when the button to start the "OOHH" scene is pressed, it shows the "OOHH" scene in Memes, playing the sound (OOHHAudio) first. After a certain amount of time passes (about 500 milliseconds), Touch Portal will then tell OBS to show the "OOHHHorn" assets from the bottom left and rotating anti-clockwise to the top left before ending with the BigHorn in the center of the screen. The timing of these horns being shown has to line up with when the audio plays an airhorn sound effect, requiring granular adjustment via milliseconds. Luckily, Touch Portal supports this function and Once all seven horns are shown, it hides ALL horn image assets leaving only the OOHHAudio source to still be shown and hiding the "OOHH" scene, so that the sound plays whenever the "OOHH" scene is triggered again.
As for the OOHH audio itself, this was spliced together using Audacity by using two separate audio files; the sound of the crowd whooping and hollering is a YouTube rip from the "Imma end this man's whole career" meme and the airhorns originate from a button found on MyInstants, where the site allows you to download the MP3 file itself. By putting the two audio files together, I created the audio track used for this meme scene and added a fade out for better audio mixing and a more pleasant listening experience for the viewer.
After setting everything up, the Meme Scene should look something like this:
Supreme Victory!
"Supreme Victory!" originates from the Killer Instinct franchise and the audio that's used is taken from the 2013 game released on Xbox One and PC. This meme scene is used to emphasize moments of triumph and typically gets paired with the "ULTRAAAA!" sound effect from the same game (which coincidentally has its own meme scene!). "Supreme Victory!" is what is referred to as a "transition" meme scene as that makes use of the transitions within OBS. For reference, here's what the Supreme Victory screen looks like with the Ultra Combo sound effect playing beforehand .
Now you're probably asking, "How do we recreate this a meme scene so we can use it in a live environment?" Luckily the audio and sound effects for this game and others can be found online via The Sounds Resource! We can download the relevant zip archives that contains the audio files. In this case we want the zip archive for Mike Willette for the "SUPREME VICTORY!" audio itself and the System UI folder because that's where the sound of the letters clanking against each other as they form "SUPREME" on the foreground come from. Once we have those two files, we can add them to our folder along with the image of the word "SUPREME" from the game and we can begin to set the letters up so that the transitions can work properly including hiding the sources by default so we can set them up properly in Touch Portal for granular activation of all sources. Ensuring that we do this properly means keeping in mind the following:
The length of accompanying audio tracks.
The visual assets and their presentation.
Touch Portal timings.
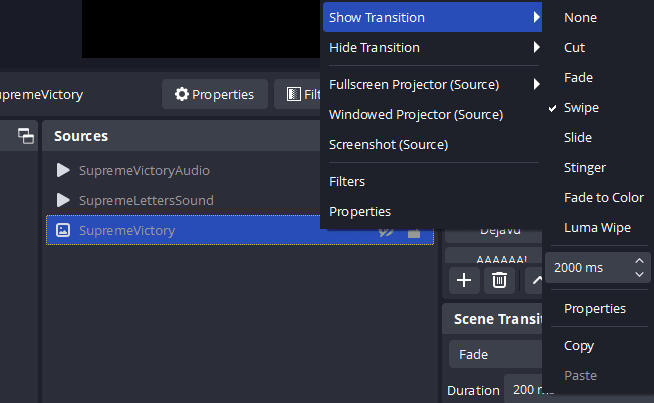
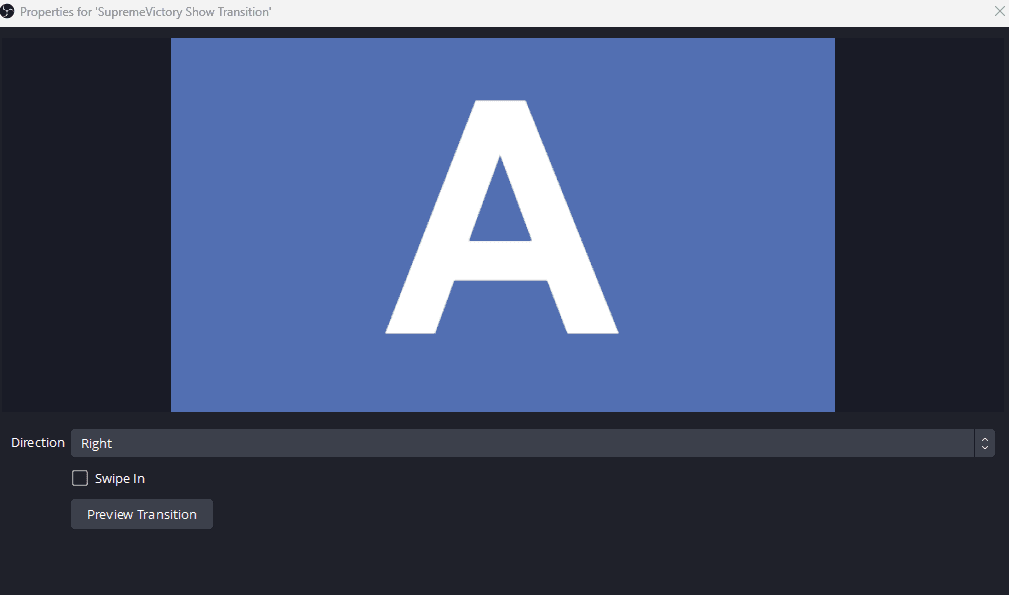
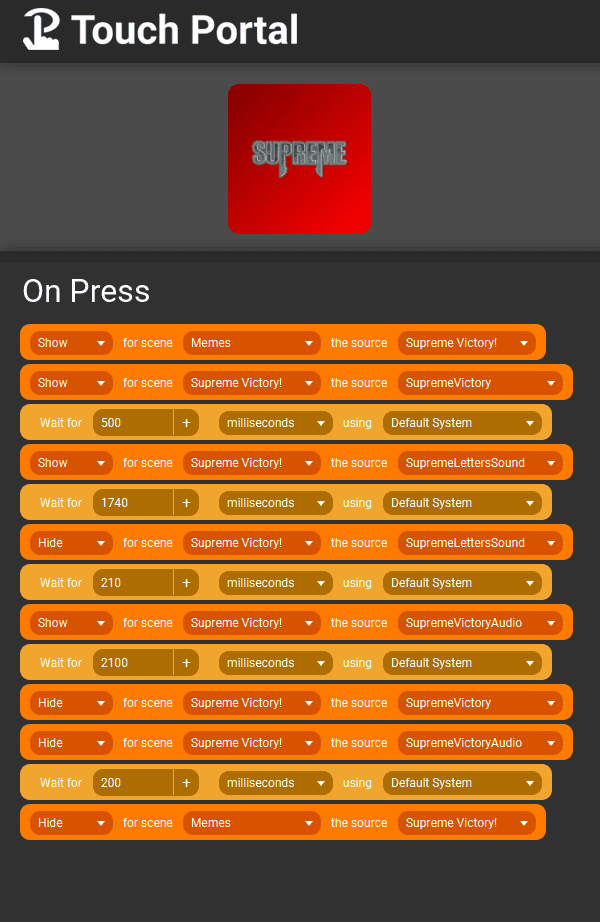
In this case, we first need to refer to the sound of the letters hitting the screen, which normally takes about a second or two to fully play back. We can make a small buffer period between the button being pressed and the sources activating such that it gives the letters time to properly initiate their transitions and to appear/sound a little closer to how it looks in the game. We want the 'show' transition of the letters to last as long as the audio plays back for and to hide it in time to play the announcer saying, "SUPREME VICTORY!". The show transition will need to be a Swipe transition that lasts 2000 milliseconds and swipes from the right. To set directions, click on the "Properties" menu of the Show Transition menu to select the swipe direction. In this case we'll be clicking right so the image swipes to the right.
This means creating a buffer timer that lasts for a couple hundred milliseconds between the SupremeLettersSound source ending and the SupremeVictorySound source playing. When the latter finishes playing, we hide all sources, adding a transition for the SupremeVictory image to fade out.
Our Touch Portal should look something like this:
At the end of all our setup, our SupremeVictory meme scene should look like this:
Deja Vu
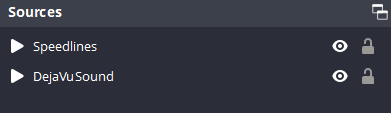
Deja Vu is an example of what is known as a "filter" scene because it's made possible through OBS filters. Our source tree for the Deja Vu source is a lot smaller with only two sources; a SpeedLines media source and a snippet of the song 'Deja Vu' by Initial D. This source is used mostly to highlight things that either look or seem familiar, often in response to backtracking.
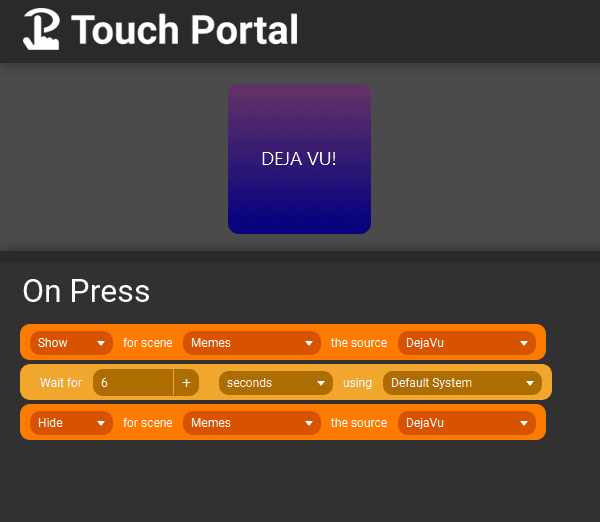
Because we're only dealing with two sources that activate at the same time, we need to make sure that the scene only lasts as long as the audio file that's being played back. Because we know that we're not going to require granular activation of individual sources, we can keep all of them on at the same time so our Touch Portal actions only require a single show event for DejaVu which plays the entire scene and then hides it after the length of the audio file plays out.
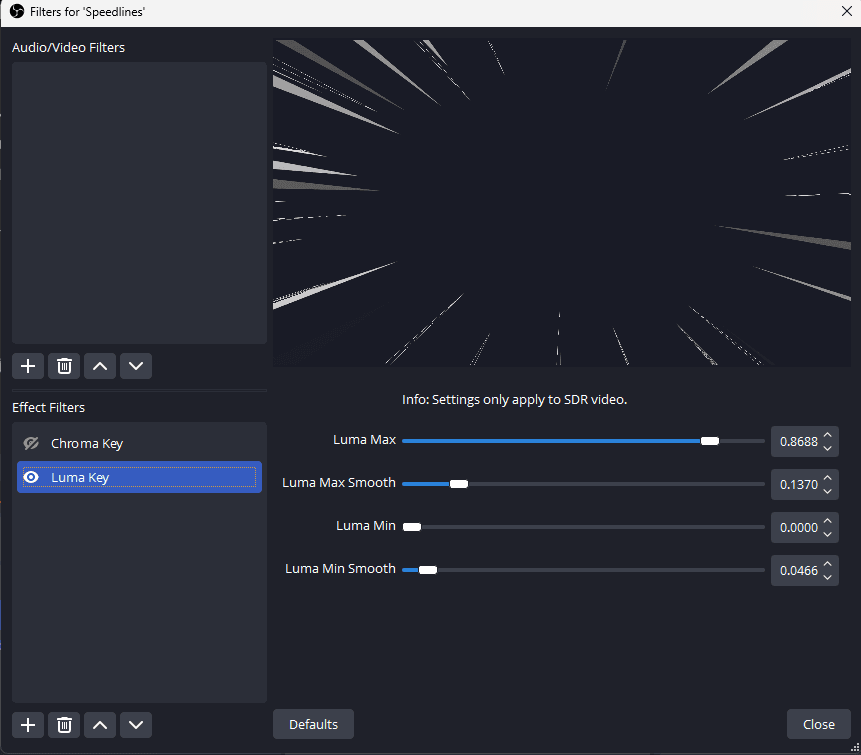
So how do filters play a role in this? Well, the Speedlines media source is a video by default; this means that we need to think of a way to add transparency to it so that when the meme scene is called it doesn't cover the entire screen completely. Luckily this is what the Lumen Key filter is used for! Simply right click on the media source you wish to change, then click "Filters". Then add a new Effect Filter and look for Luma Key. The settings below filter out the black background that the speed lines used to take place on, allowing for a transparency in the stream itself. You can customize the way this looks to ensure less artifacts and visual oddities around what you're filtering out and your requirements for this will change depending on what you're trying to do.
After enough tweaking, we should be left with this:
General Meme Scene Guidelines
When deciding on making meme scenes, there's usually a few rules worth following:
Meme Scenes should ideally last somewhere between 5-9 seconds, ten if you're pushing it. Too long and it can hamper the viewing experience for other people, even getting in the way of what you're streaming.
Meme Scenes can have alternatives and overlapping options, especially if a meme scene meant for a particular context can be obtrusive to viewing experience after repeated playbacks.
Be mindful of your volume; too loud and a meme scene can be startling and even distracting for some people but too quiet and you run the risk of a joke or a meme getting lost in your audio mixing.
Try to aim for PG-13 at most and though it goes without saying, NEVER add anything sexually explicit, racist, or anything that potentially violates Terms of Service as meme scenes, props, or sound effects.
Be mindful of where you save Meme Scenes and other audio-visual sources. You want your folder structure to be somewhere you can easily locate your files and if you move between computers, it might be in your best interest to consider using OneDrive or a similar native cloud drive utility to ensure consistency of file destinations across your computers.
- This applies to your OBS Scene Collections and Profiles, along with your Touch Portal settings files, which can be exported and saved so they can be imported to other installations of OBS and Touch Portal on other computers.
Be very mindful of copyright when selecting meme scenes; the shorter the scene, the less likely a meme scene can trigger a platform's copyright detection.
Sound Libraries like MyInstant.com are very useful for meme scenes, as are websites like YouTube.
Meme Scenes and Sound Alerts can exist side-by-side, so don't be afraid to have them both at any given time!
Touch Portal as an External Stream Control Tool
We discussed using Touch Portal as a means to set up Meme Scenes up till now, but this part will be dedicated to mentioning the various ways that Touch Portal can be used to control your stream. Individual sources and scenes can be toggled and cycled through each other along with the ability to manually adjust the volume of your audio sources including being able to outright mute them. Below is a refresher of what my Touch Portal interface looks like as of this writing, but special attention will be paid to the top half rather than the bottom half.
Stream control buttons on the top half of the screen generally fall into two categories: The first are Source Toggles, which control whether a display capture is enabled or not. The breakdown for most source toggles in Touch Portal are pretty simple, just a single toggle action for that specific screen.
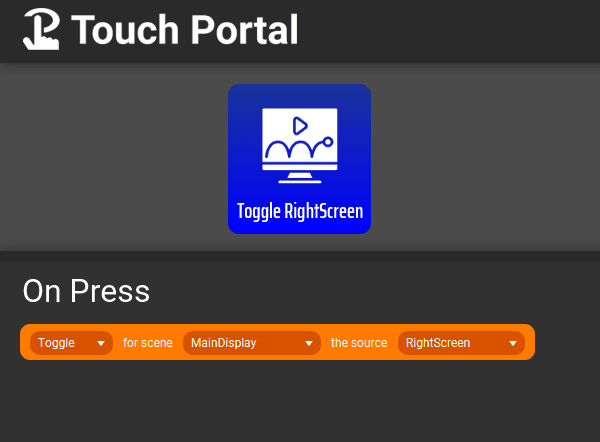
Then there are Scene Toggles, which work in tandem with the Studio Mode and Scene Transition buttons in how the buttons themselves are designed to detect whether Studio Mode is enabled.
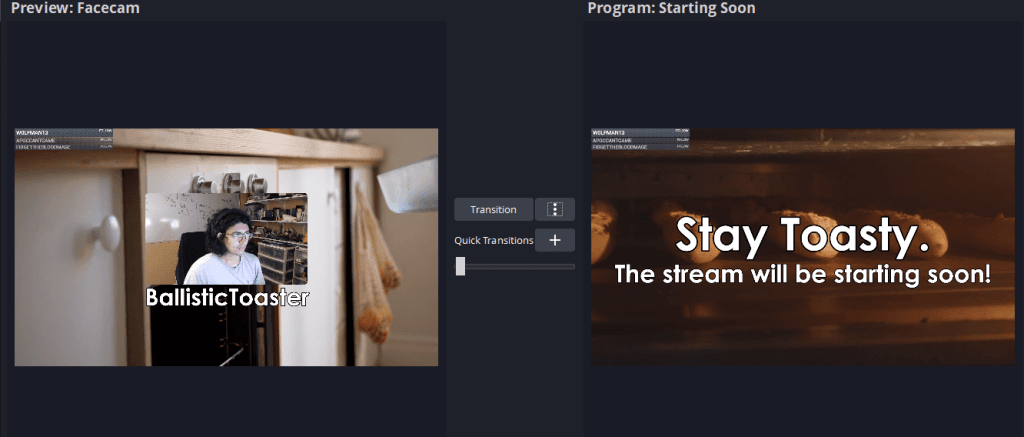
Studio Mode is a feature in OBS that allows you to preview your scenes and how they appear before transitioning them to live scenes for your viewers. When Studio Mode is enabled, OBS splits into two panes; one for the currently live scene on your right and one for a preview of what you're about to make go live on your left with a "Transition" button in the center. When pressed, your Preview scene appears to your right on the Program pane, thus ensuring it goes live to your viewers.
Because of this, more actions are needed to ensure that Touch Portal can detect whether Studio Mode is detected or not and luckily, there is. By setting up a conditional (If/Else), we can detect whether Studio Mode is on or not and then choose to enable or disable Studio Mode from there. If it isn't, it's turned on but if it is, we turn it off. Right above it is a transition button that we can use to transition our preview scenes to live scenes.
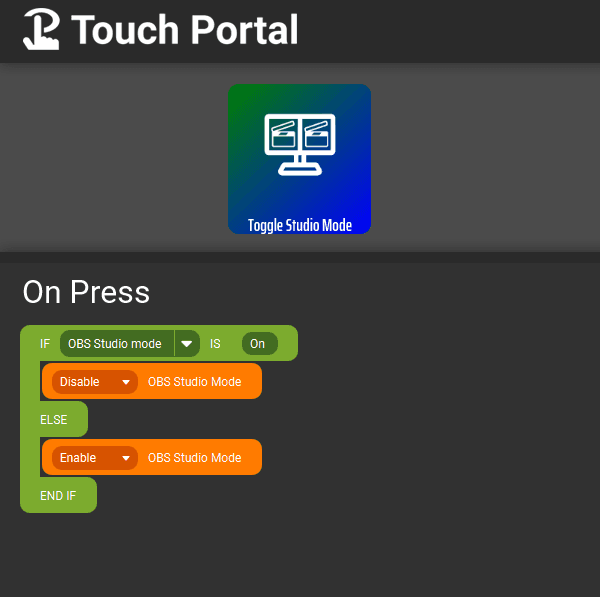
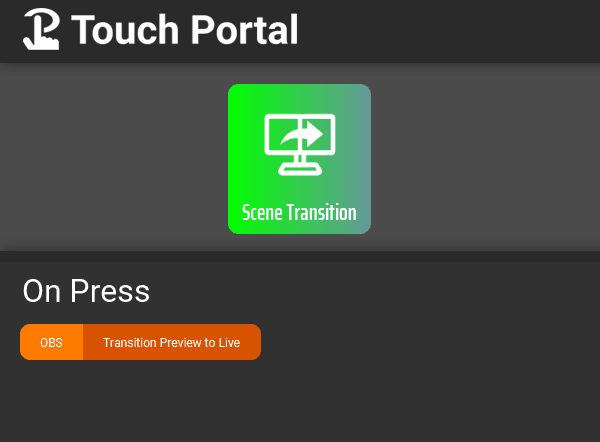
The Studio Mode button is what allows us to build scene toggles since they use a similar structure: If OBS Studio Mode is on, only the preview is set to that scene but if it isn't, we can just transition right to that scene right away.

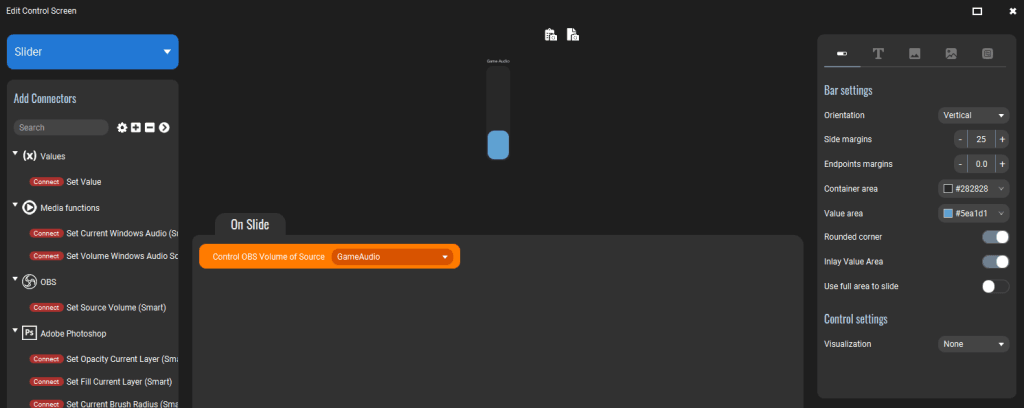
Touch Portal also doesn't just create buttons, it allows for sliders! selecting the top left blue button on the Edit Control Screen, we can select "Slider" and then select "Set Source Volume" and control whichever source we like. In the picture below, we're choosing to make a slider for our GameAudio channel and from the Bar settings pane to the right, we can choose whether to set the bar to horizontal or vertical on the leftmost tab, along with the length and size of the bar on the rightmost tab.
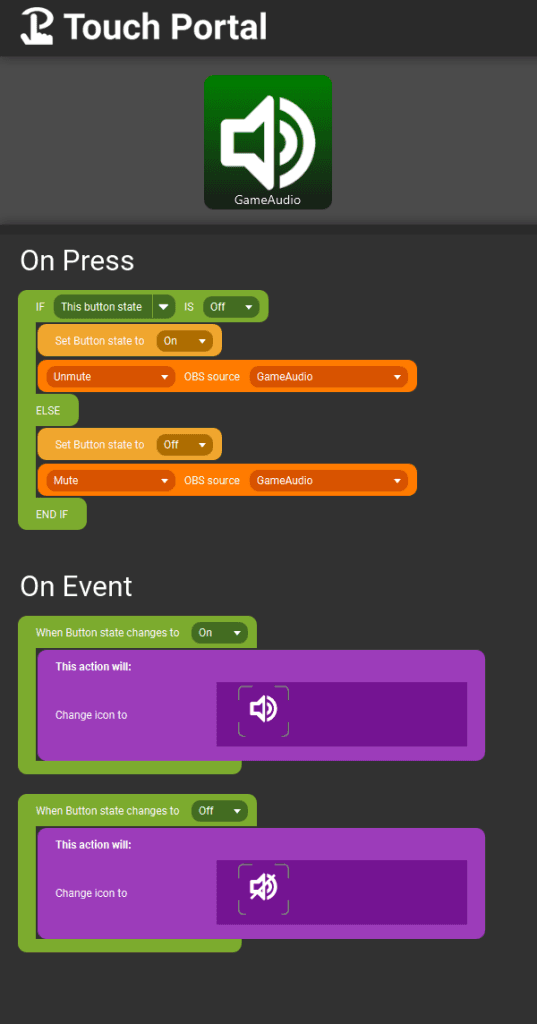
Our mute buttons below the bars are a fair bit more complicated than the average source toggle, and require setting button states to ensure proper functionality and visual discernability. If the button's state is off, the button state is turned on upon being pressed and the icon changes to denote that the audio source is audible. If we press the button again, we'll mute the audio and the icon changes to denote that the audio is muted while setting the button state to off, thus ensuring the conditional works properly.
Touch Portal Alternatives
Touch Portal is far from the only viable alternative available. The aforementioned Elgato Stream Deck is a very solid choice for newcomers with multiple variants, including a smaller six-button model. Elgato even offers a smart device application called Stream Deck Mobile for a small monthly or annual subscription fee. Streamlabs also has an external stream control tool in the form of Streamlabs Controller, a smart device app that only connects to Streamlabs OBS.
There are also ways to piece together your own Stream Deck making use of software like Antsoft's Key Remapper and a $15 external number pad to initiate the actions on your own like what one redditor has done and detailed in this thread.
Whatever you choose to go with, you can't go wrong as long as you keep in mind your requirements and what you personally want out of your stream and the tools you wish to use. Everything after that is a question of trial, error, and setting things up to work in the best way possible for you and there's a lot of flexibility in what you can choose to use and how to get all of it to work properly alongside other applications you use with plenty of room for automation.
Future Changes? + Conclusion
What I've built in Touch Portal has been incredibly helpful for me throughout my streaming career and the ways in which I use it have changed since I started using in 2021. That said, there's a lot I'd want to change in how I use it and what I'd want to add beyond "More Meme Scenes lol." I'd like to add more automation through the usage of channel points down the line and maybe even something like a shoutout button. I also want to refactor several of my buttons and make them a little cleaner to navigate and fix, and in the future, I want to make Touch Portal itself a part of my chat. Several functions in Touch Portal allow you to connect to your channel's chat on Twitch and to do some really neat stuff with it and I have a few ideas of what I'd want to do with that, some of which I might even document here on this very space.
In truth, I feel like I only scratched the surface of what's possible using Touch Portal and I can't wait to see what some of you come up with when it comes to this app or indeed, any other external stream control tool. One of my streamer friends makes very heavy use of Touch Portal alongside Mix It Up and it's led to some very creative outcomes I never thought possible! Talk shop with some of your friends who know how to use these things and see if they can help you out and always remain curious. The best way we can grow is to seek out knowledge and in time, you'll be the one to share what you learned with others too.
I hope this post helps some of you out and if you have any questions, feel free to reach out to me.
Stay toasty for the final part as we discuss moderation, raid settings, overlays, and a few other general guidelines to keep in mind when you're live and on the air!
Until next time, this is BallisticToaster signing off!